Using Alpine.js + Tailwind CSS in Django templates
Posted January 09, 2022
Let’s pretend that you need a modern and pretty mobile-first website created with Django but it should have interactive interfaces for header navigation menu and other things. Server-side rendered Django template system doesn’t have such features out of the box, so you require an additional JavaScript and CSS framework. The obvious and familiar choice is to use Bootstrap for CSS and jQuery for JavaScript, but give it a try for something completely different.
As an example, I propose to make a website with two pages which have header and footer in common. The first page is the index page with some CTA, and the other page contains countries list table with data fetched from the backend database.
For an introduction, I can describe Alpine.js as the lightweight JavaScript framework with interesting syntax realized by adding JavaScript behavior to HTML markup. Think of it like jQuery for the modern web, as Alpine.js creators refer to it.
Tailwind CSS is the framework with a lot of design features with minimal stylesheet coding, but adding related classes to HTML markup for styling your layout.
We are not going to consider including Alpine.js and Tailwind CSS to templates via CDN link, it’s rather easy and inefficient way to use. The Tailwind CDN build is heavy and not customizable. We will build minified CSS file and JS bundle with npm and Webpack (you can choose any other build system as you wish).
To reproduce the steps from this guide you should have maintained stable 3.x python version and stable Node.js installed at your operating system.
Virtual environment
Create and invoke virtual environment for python3 (given invoking is for Unix systems, for Windows see the documentation of venv module).
python3 -m venv env
source env/bin/activate
Now the command line will display the name of the virtual environment in brackets before prompt cursor like this:
(env) user@user:~$
Create Django project
At first we need to upgrade package manager and install Django package to our virtual environment.
python -m pip install -U pip
pip install django
Thereafter create Django project and fill it with views, urls and templates as usual:
-
Start Django project.
django-admin startproject django_alpine_tailwindcss cd django_alpine_tailwindcss -
Verify your new project works, run the development server. When the development server is running, visit http://localhost:8000 and you’ll see the default generic page with congratulations.
python manage.py runserver -
Start new Django application
tableswhere we’ll store basic MVC structure.python manage.py startapp tables -
Register new application in
django_alpine_tailwindcss/settings.py.# Application definition INSTALLED_APPS = [ # Here 'tables.apps.TablesConfig', 'django.contrib.admin', 'django.contrib.auth', 'django.contrib.contenttypes', 'django.contrib.sessions', 'django.contrib.messages', 'django.contrib.staticfiles', ] -
Create views for index and countries pages in
tables/views.pymodule with genericTemplateViewandListViewclasses. At this moment we don’t need any other logic here except template name to use.from django.views.generic.list import ListView from django.views.generic import TemplateView class CountriesListView(ListView): template_name = 'countries.html' class IndexView(TemplateView): template_name = 'index.html' -
Create
tables/urls.py.touch tables/urls.py -
Add URL dispatcher for tables app in created
tables/urls.pyand registerIndexViewandCountriesListViewas available views.from django.urls import path from .views import CountriesListView, IndexView urlpatterns = [ path('', IndexView.as_view(), name='index'), path('countries', CountriesListView.as_view(), name='countries'), ] -
Include
tables/urls.pyin globaldjango_alpine_tailwindcss/urls.pyURL dispatcher.from django.contrib import admin from django.urls import path, include # Don't forget import include urlpatterns = [ # Here path('', include('tables.urls')), path('admin/', admin.site.urls), ] -
Create project-shared directories for templates and for static files.
mkdir templates static -
Register path to templates in
django_alpine_tailwindcss/settings.py.TEMPLATES = [ { 'BACKEND': 'django.template.backends.django.DjangoTemplates', # Register path to templates directory here 'DIRS': [BASE_DIR / 'templates'], 'APP_DIRS': True, 'OPTIONS': { 'context_processors': [ 'django.template.context_processors.debug', 'django.template.context_processors.request', 'django.contrib.auth.context_processors.auth', 'django.contrib.messages.context_processors.messages', ], }, }, ]You can use application’s directory for templates, later you’ll see the simplicity of this approach for such project.
-
Add path to static files at the end of
settings.pyfile.STATICFILES_DIRS = [ BASE_DIR / 'static', ]
Start npm project
To prepare templates and static files for Django we need to initialize basic npm project, where we’ll build files from assets and put them to Django project directories.
-
Create directory for
npmproject inside Django project and startnpmproject.mkdir boilerplates cd boilerplates npm -y init -
Create basic
npmproject structure.mkdir src touch src/index.js
Install Alpine.js
Let’s install Alpine.js as a module
and initialize Alpine in src/index.js.
npm install alpinejs
Suppose we need a variable to store state of our dropdown menu list:
open or closed. So let’s create in src/index.js file our open
variable in Alpine object.
import Alpine from 'alpinejs';

Alpine.data('app', () => ({
  open: false,
}));

window.Alpine = Alpine;
Alpine.start();
The first argument 'app' in data property establishes the name of component
that can be used in DOM. This is one way to use Alpine.js as a familiar JavaScript
framework, later I’ll show how to use directives and store variables inside HTML
markup.
Install Tailwind CSS
We’ll take installation recipes from Tailwind documentation.
npm install -D tailwindcss@latest postcss@latest autoprefixer@latest
npx tailwindcss init --postcss
After installation and creating configuration, there’ll be two configuration files
inside npm project: tailwind.config.js and postcss.config.js.
Create src/style.css file to initialize Tailwind usage in npm project.
touch src/style.css
After inject Tailwind’s base, components, and utilities styles into
src/style.css and add stylesheet import to src/index.js:
@tailwind base;
@tailwind components;
@tailwind utilities;
import './style.css';
import Alpine from 'alpinejs';

...
By default the Tailwind config do not minify CSS build to used classes and
elements in files, so we need to specify paths to files in content
property in tailwind.config.js file.
module.exports = {
  content: [
    './src/*.html',
    './src/*.js'
  ],
  theme: {
    extend: {},
  },
  variants: {
    extend: {},
  },
  plugins: [],
};
Install Webpack and related modules
-
At first let’s install basic setup for Webpack and later we expand it for our needs.
npm install webpack webpack-cli --save-dev -
Create file
webpack.config.jsto store Webpack configuration.touch webpack.config.js -
Add basic configuration to
webpack.config.js.const path = require('path'); module.exports = { mode: 'production', entry: './src/index.js', output: { filename: 'index.js', path: path.resolve(__dirname, '../static'), }, };We will use production mode right away to minify JavaScript files.
module.exports = {
  mode: 'production',
  ...
}
Entry point and output filename will be the same.
Also output file will be placed straightaway to Django static directory.
output: { filename: 'index.js', path: path.resolve(__dirname, '../static'), }, -
Add Webpack build command to
package.json."scripts": { "build": "webpack", "test": "echo \"Error: no test specified\" && exit 1" } -
Install modules to gather and build CSS files. Our Tailwind configuration requires only plain CSS and PostCSS modules.
npm install --save-dev css-loader postcss-loader mini-css-extract-plugin -
Add CSS assets rules to
webpack.config.js. CSS and PostCSS loaders will process ourstyle.cssfile and all related stylesheets from installed Tailwind.const path = require('path'); const MiniCssExtractPlugin = require('mini-css-extract-plugin'); module.exports = { mode: 'production', entry: './src/index.js', plugins: [ new MiniCssExtractPlugin({ filename: 'style.css', }), ], module: { rules: [ { test: /\.css$/i, use: [ MiniCssExtractPlugin.loader, 'css-loader', 'postcss-loader' ], }, ], }, output: { filename: 'index.js', path: path.resolve(__dirname, '../static'), }, };
Create HTML templates and add them to Webpack
For Django templates we need the skeleton base.html template with common elements
to each page like header and footer. For start page we’ll create index.html with
elements according to the required layout.
We can use Django template language inside for Webpack HTML templates (I’ll call them boilerplates to distinguish from Django templates). It doesn’t care if HTML file is a snippet and have foreign template markup as we will have in our templates.
touch src/base.html src/index.html
Here’s the ready-made layout for base.html with Tailwind classes:
<!DOCTYPE html>
<html lang="en_US">
  <head>
    {% load static %}
    <meta charset="utf-8" />
    <meta name="viewport" content="width=device-width, initial-scale=1" />
    <title>{% block title %}{% endblock %}</title>
    <link href="{% static 'style.css' %}" rel="stylesheet">
    <script defer src="{% static 'index.js' %}"></script>
  </head>
  <body class="flex flex-col h-screen">
    <header x-data="app">
      <nav class="flex px-8 py-4 shadow-md bg-blue-400 justify-between">
        <div class="flex items-center space-x-8">
          <a href="{% url 'index' %}" class="block self-start">
            <span class="text-2xl font-bold">App Logo</span></a>
          <a href="{% url 'countries' %}"
            class="hidden md:block hover:text-indigo-900">Countries</a>
        </div>
        <div class="md:hidden flex flex-col items-end">
          <button x-on:click="open = !open" class="outline-none menu-button">
            <svg viewBox="0 0 80 65" width="30" height="30">
              <rect width="80" height="15"></rect>
              <rect y="25" width="80" height="15"></rect>
              <rect y="50" width="80" height="15"></rect>
            </svg>
          </button>
          <div x-show="open" x-transition:enter.duration.750ms
            x-transition:leave.duration.500ms>
            <ul class="text-right text-xl py-2 space-y-2">
              <li>
                <a href="{% url 'countries' %}">
                  Countries
                </a>
              </li>
            </ul>
          </div>
        </div>
      </nav>
    </header>
    {% block content %}{% endblock %}
    <footer class="bg-gray-700 py-4 px-8">
      <p class="text-blue-300">Cool App Inc.</p>
    </footer>
  </body>
</html>
There is basic Django tag {% load static %} to load static files into
template and {% block title %}{% endblock %} tags to interpolate another
markup parts with template inheritance.
Also there are unusual HTML attributes like x-data="app" in header tag. This is how we
inject Alpine.js directives inside markup with Alpine object from index.js.
The app value is the name of component to use in context.
For mobile screen layout there’s button which open special mobile navigation menu.
Click on the button toggles state of open variable from app component.
<button x-on:click="open = !open" class="outline-none menu-button">
Navigation menu will show and hide according to open state.
<div x-show="open">
  <ul class="text-right text-xl py-2 space-y-2">
    <li><a href="countries">Countries</a></li>
  </ul>
</div>
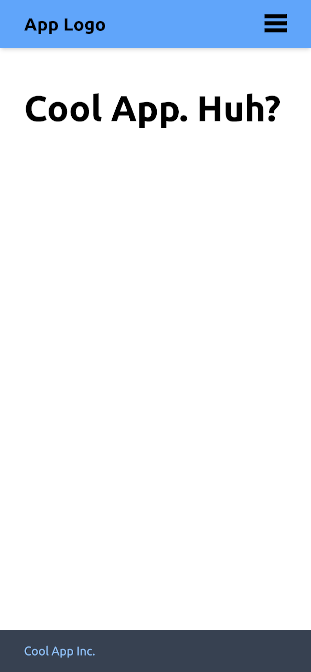
The layout for index.html:
{% extends "base.html" %}
{% block title %}Cool App Index Page{% endblock %}

{% block content %}
<main class="px-8 py-14 flex-grow">
  <h1 class="text-5xl font-extrabold">Cool App. Huh?</h1>
</main>
{% endblock %}
Install html-webpack-plugin to use boilerplates in Webpack build.
npm install --save-dev html-webpack-plugin
And add HtmlWebpackPlugin constructors to webpack.config.js
as plugins.
const path = require('path');
const MiniCssExtractPlugin = require('mini-css-extract-plugin');
const HtmlWebpackPlugin = require('html-webpack-plugin');

module.exports = {
  mode: 'production',
  entry: './src/index.js',
  plugins: [
    new MiniCssExtractPlugin({
      filename: 'style.css',
    }),
    new HtmlWebpackPlugin({
      filename: '../templates/base.html',
      template: 'src/base.html',
      inject: false,
      minify: false,
    }),
    new HtmlWebpackPlugin({
      filename: '../templates/index.html',
      template: 'src/index.html',
      inject: false,
      minify: false,
    }),
  ],
  ...
Every constructor has the following properties:
filenameis the target path to build (we specify to directory where Django will look for templates to use in its views).templateis the path to boilerplate to use.injectvalue is false, we don’t need to add links to.jsand.css(which is done by Webpack module by default) inside built templates, they already have built-in Django tags for static files.minifyvalue is false just for the convenience and readability of final built template.
So, let’s build templates with Webpack.
npm run build
Check Django templates and static directories and you’ll see generated files.
ls ../templates
base.html  index.html

ls ../static
index.js  style.css

ls -lh ../static # -lh flag show files size in human-readable format
total 60K
...
60 kilobytes is pretty normal size for CSS and JS bundles in comparison with unpurged heavy Tailwind CSS library. PostCSS picked out only used in boilerplates CSS rules from the whole Tailwind library file and created minified CSS stylesheet for our needs.
Return to Django directory and try to run server to see the result.
cd ..
python manage.py runserver
Visit http://localhost:8000 and you’ll see the index page with stylings. Try to click on menu bar and it’ll show and hide the navigation menu in a smooth way.
The page with countries doesn’t ready yet, so it’s pointless to try visit it.
Countries page
Making button for responsive menu is rather easy and doesn’t need the whole JavaScript framework for it. Let’s make another page with table that contains list of countries, which we can sort by population in ascending and descending order.
Such implementation doesn’t show the reactivity features of Alpine.js in the full sense of the word, but shows how we can use data from backend and manipulate DOM at the same time like it’s an SSR JS framework. Manipulating tables also doesn’t require the whole framework for it, but you still have a lot of Alpine directives and tools to develop your own features at small cost.
Create model and refine view for countries page
For example, we’ll store countries that have shorelines along the Baltic Sea. All the data is taken from Wikipedia, so it can be out of date.
-
Add
Countrymodel totables/models.pyto store countries in database with fieldstitle,capitalandpopulation.from django.db import models class Country(models.Model): title = models.CharField(max_length=50, unique=True) capital = models.CharField(max_length=50, unique=True) population = models.IntegerField() class Meta: verbose_name_plural = 'countries' def __str__(self): return self.title -
Migrate created model.
python manage.py makemigrations tables python manage.py migrate -
Add data with Django shell.
python manage.py shellThis command will start the Python interactive interpreter where we can add data with Django QuerySet API. Input the following lines one by one.
(InteractiveConsole) >>> from tables.models import Country >>> Country.objects.create(title='Danmark', capital='København', population=5850189) >>> Country.objects.create(title='Deutschland', capital='Berlin', population=83190556) >>> Country.objects.create(title='Eesti', capital='Tallinn', population=1330068) >>> Country.objects.create(title='Latvija', capital='Rīga', population=1907675) >>> Country.objects.create(title='Lietuva', capital='Vilnius', population=2775810) >>> Country.objects.create(title='Polska', capital='Warszawa', population=38268000) >>> Country.objects.create(title='Suomi', capital='Helsinki', population=5536146) >>> Country.objects.create(title='Sverige', capital='Stockholm', population=10402070) >>> Country.objects.create(title='Россия', capital='Москва', population=143759445) >>> # Check that you have 9 Country objects and exit the interpreter >>> Country.objects.count() 9 >>> exit() -
Update
CountriesListViewview.from django.http import JsonResponse # New import from django.views.generic.list import ListView from django.views.generic import TemplateView from .models import Country # Don't forget to import model class CountriesListView(ListView): model = Country # Add model template_name = 'countries.html' def get_context_data(self, **kwargs): context = super().get_context_data(**kwargs) context['object_list'] = JsonResponse( list(self.object_list.values()), safe=False ).content.decode('utf-8') return context ...Here the
Countrymodel added to view and new methodget_context_datawhich override the defaultobject_listcontext value to JSON which contains a list of JavaScript objects with countries data. Such data representation can be parsed in templates by Alpine.js.
HTML template for countries page
Now we have backend logic for countries data view, let’s create new boilerplate to build template for countries page.
-
Go to
boilerplatesdirectory and create new boilerplatesrc/countries.html.cd boilerplates touch src/countries.html -
Here’s the ready-made layout for
countries.htmlwith Tailwind classes.{% extends "base.html" %} {% block title %}Countries Around Baltic Sea{% endblock %} {% block content %} <main class="px-8 py-14 flex-grow" x-data="{ countries: {{ object_list }}, order: 1, sort() { this.order *= -1; }, get sortedByPopulation() { return this.countries.slice(0).sort( (c1, c2) => (c2.population - c1.population) * this.order ); }, }"> <h1 class="text-5xl font-extrabold"> Countries Around Baltic Sea </h1> <table class="table-auto divide-y-2 divide-black my-8"> <thead class="text-left"> <tr> <th class="px-2 py-1">Country</th> <th class="px-2 py-1">Capital City</th> <th class="px-2 py-1" :class="order === 1 ? 'descending' : 'ascending'" @click="sort"> Population </th> </tr> </thead> <tbody class="divide-y divide-blue-400"> <template x-for="country in sortedByPopulation"> <tr> <td class="px-2 py-1" x-text="country.title"></td> <td class="px-2 py-1" x-text="country.capital"></td> <td class="px-2 py-1" x-text="country.population"></td> </tr> </template> </tbody> </table> </main> {% endblock %}This template extends
base.htmlsuch asindex.html.Take a look at
x-datadirective in<main>tag. There’s acountriesvariable to store countries data from Django view. Also directive has a variable to store order of countries representation and two functions: one is to change order of data and the other to sort data by population and order value.Further there’s a table with three columns: Country, Capital City and Population. Also, Population head cell has special binding class to show the order of data sorting: ascending or descending, implemented as ternary operator. After we’ll add related class rules to CSS stylesheet. Clicking on Population head cell will cause the change of sorting order.
<th :class="order === 1 ? 'descending' : 'ascending'" @click="sort">Population</th> -
Add rules to
ascendinganddescendingclass selectors insrc/styles.css.@tailwind base; @tailwind components; @tailwind utilities; .ascending:after { content: " ▲"; color: rgba(59, 130, 246); } .descending:after { content: " ▼"; color: rgba(59, 130, 246); } .ascending:hover::after { color: black; } .descending:hover::after { color: black; } -
And add another one
HtmlWebpackPluginconstructor forsrc/countries.htmltowebpack.config.js.... plugins: [ new MiniCssExtractPlugin({ filename: 'style.css', }), new HtmlWebpackPlugin({ filename: '../templates/base.html', template: 'src/base.html', inject: false, minify: false, }), new HtmlWebpackPlugin({ filename: '../templates/index.html', template: 'src/index.html', inject: false, minify: false, }), new HtmlWebpackPlugin({ filename: '../templates/countries.html', template: 'src/countries.html', inject: false, minify: false, }), ], ... -
Try the new one build with webpack and check Django templates and static directories.
npm run buildls ../templates base.html countries.html index.html ls -lh ../static total 60KThe size of static files is about the same, but we have an additional template with all frontend logic inside of it.
-
Get back to Django project and run the server to view new page.
cd .. python manage.py runserver -
Visit http://localhost:8000/countries and you’ll see page as in the picture below.
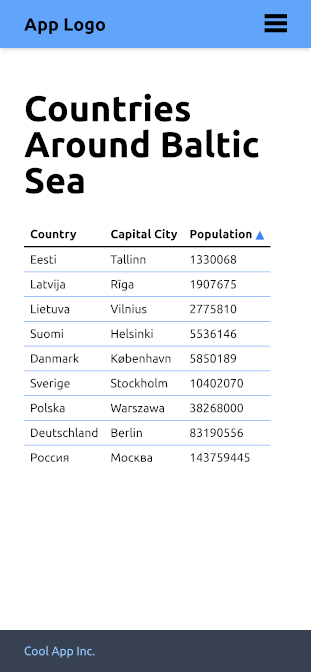
Try to click on Population triangle symbol and you’ll see how the table is reordering.
Now we have Django application which combines server-side rendered templates with data from backend storage and its representation that can be changed at client side. In addition, Alpine framework allows us to add some true reactivity and other features to our application without massive extending of bundle size and Tailwind CSS in tandem with PostCSS grant us the opportunity to use the complete design system as little as possible and customizable.
Further reading
Check out the django-alpine-tailwindcss repository if you have some difficulties with this guide. All the steps described are reproduced one by one there. Suggestions for improvements and bugs are also welcome.
Also note the documentation of used stack: